
I’ve been using a spreadsheet for three years. An employee gave it to me before they left, and I never learned how to manage it properly. This spreadsheet, currently named Master Tracker FINAL v3.xlsx, handles most of our small operations team’s tasks, like bringing on new clients, tracking invoices, and reminding clients about follow-ups.

There were many steps to keep that spreadsheet updated. I’d get emails from clients with questions, then I’d have to search through documents and type the information into the spreadsheet. I was dealing with about forty emails a week, which really defined my job.
I found out about Power Automate by chance. I was not looking for Power Automate or any other automation tools at that time. A friend of mine who works in the IT department saw me having a time with the spreadsheet during a video call. He asked me why I was doing everything by hand with the spreadsheet. I said to my friend that I did not know any way to do it with the spreadsheet.He sent me a link to Power Automate that same day.
Basically, Power Automate is software that waits for something to happen and then automatically does something in response, without you needing to do anything.
More formally, Power Automate is Microsoft’s service for automating workflows in the cloud. It links various apps and systems – like email, spreadsheets, chat programs, forms, and databases – so that an event in one system can automatically trigger an action in another. The Microsoft Power Platform has a few parts to it, including Power BI, which is used for looking at data, and Power Apps, which is used for making simple custom applications.
If the company you work for uses Microsoft 365 you probably already have Power Automate. This was a surprise to me. At first I thought I would need to get permission or pay for a new subscription.. I just logged in with my regular work account and Power Automate was right there, in the app launcher. I had not really used Power Automate before.
What is Flow in Power Automate?
In Power Automate, each automation that you build is called a flow. Think of a flow as a simple rule: if X happens, do Y.
Flows can run instantly when they are triggered, run at specific times (schedules), or wait for your approval.
What Is a Connector in Power Automate?
Power Automate has connectors to external applications, such as Outlook, Excel, SharePoint, Teams, Gmail, Dropbox, Twitter (now X), Slack, etc. Depending on your license, there are standard and premium connectors. Standard connectors are included in most licenses; premium connectors are more advanced and require a license.
(There is a lightning bolt symbol on the premium connectors to warn you if you are trying to use a connector your license doesn’t allow.)
What Is the Power Automate Mobile App?
I avoided the Power Automate mobile app for about six months, convinced that it was simply a notification tool. Turns out, the mobile app can also be used to trigger selected flows manually, approve pending requests on the run, and even build very simple flows based on things like button pushes or your location.
The Three Essential Building Blocks of All Flows
Once I grasped the core idea behind each of these three items, the rest of Power Automate started to click a whole lot faster. Trigger: Every flow must have one of these at the very beginning. It is the event that kicked off the process.
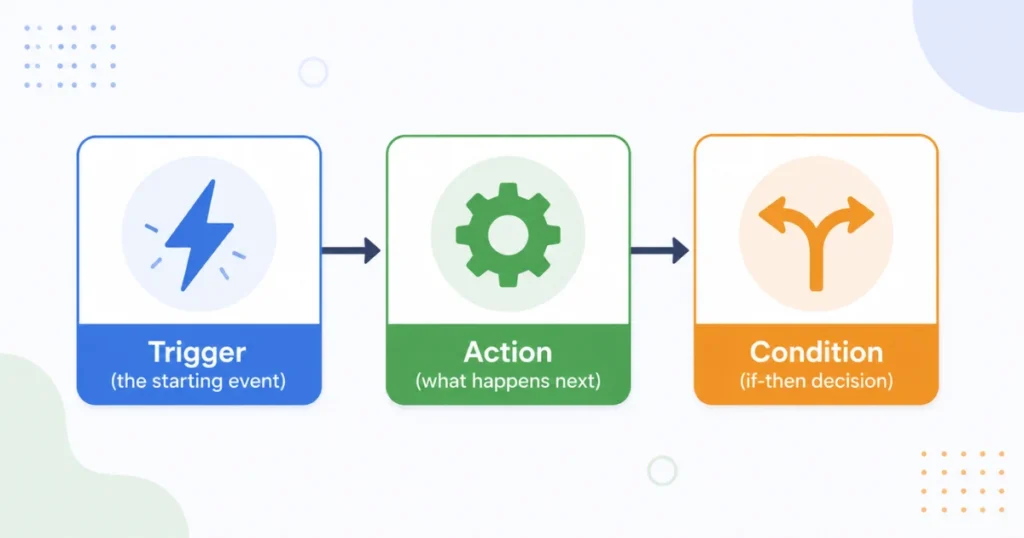
Examples of triggers include the arrival of a new email, the upload of a file to a folder, reaching a specific time on a schedule, or the submission of a form.
This is arguably the trickiest part. Choosing the wrong trigger can either have your flow running all the time with irrelevant stuff or never at all! Action The trigger kicks off the process, and then one or more actions are performed. These are things like “send an email,” “create a document,” “update a cell in Excel,” or “post to Microsoft Teams.”
Multiple actions can be performed one after another, and each one can pull information from one that has already occurred.
In programming, we often refer to these as “conditional statements” or “if-then” statements. In a flow, a condition causes the flow to take one path or another, depending on whether something is true or false. This is where the real intelligence of automation comes from.
Power Automate versus other tools –
My 2 cents People ask me what the big difference is between using Power Automate and using Zapier or Make (previously Integromat). Here’s my unbiased, non-salesy answer. If you’re working within the Microsoft ecosystem – that is your organisation lives primarily in Outlook, Teams, SharePoint, and Excel then Power Automate is definitely the most natural option, particularly as it is already integrated into the suite.
If you’re trying to stitch together an eclectic range of non-Microsoft services such as Slack, Trello, Mailchimp and Shopify, then Zapier can often have a quicker, more polished workflow and is sometimes simpler to get going, although costs can rise as you scale the number of flows.
I primarily use Power Automate for all my within-Microsoft-world integrations and for a side project I used Zapier for a bit ( Shopify and Mailchimp – check out the integration!).
My First Real Flow (And the Embarrassing Mistake That Came With It)
My first real flow was meant to solve the exact spreadsheet problem that got me into this in the first place. The plan: whenever a client sends an email containing the word “status update,” extract key details and update a specific row in Excel Online automatically. I built it in an afternoon, feeling unreasonably proud of myself. Then I tested it, and it updated the wrong row. Every single time. After about an hour of confused troubleshooting, I realised the issue. I had set the flow to match rows based on a client name column, but two clients in our spreadsheet had almost identical names – “Whitmore Logistics” and “Whitmore Logistics Group.” The flow kept grabbing whichever row it found first. The fix required adding a unique client ID column to the spreadsheet and having the flow match against that instead of the name. It sounds obvious in hindsight, but at the time it taught me something important: automation is only as reliable as the data structure underneath it. If your source data is messy or ambiguous, no amount of clever flow-building will fix that. You have to fix the data first.
A Step-by-Step Guide for Getting Started
If you are building your Power Automate flow here is the approach I would recommend based on what actually worked for me versus what I stumbled through the hard way.
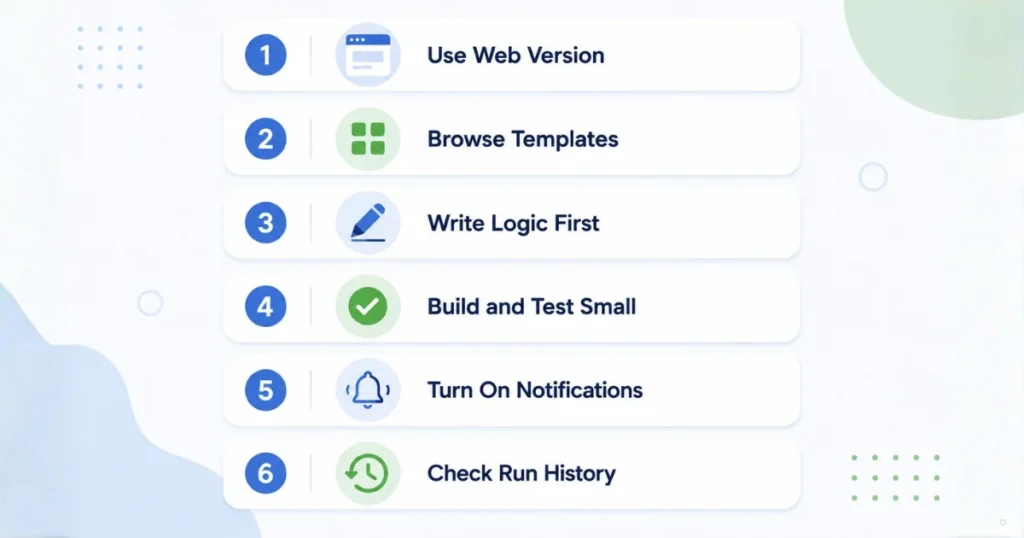
- Step 1: Use the web version of Power Automate first. Go to your Microsoft account. The desktop version of Power Automate, which automates actions on your computer, is a more advanced tool for a different kind of problem. Beginners should start in the browser with Power Automate.
- Step 2: Browse Power Automate templates before building from scratch. There is a template library covering common needs. Saving attachments, sending reminders, syncing calendars, posting approvals. Search for your goal in Power Automate. I probably would have saved myself a week of confusion if I had checked Power Automate templates before trying to build everything with Power Automate.
- Step 3: Write your Power Automate flow logic in English first. Before touching the Power Automate interface, write the sentence: “When a trigger happens, do an action. Only if a condition is met.” This single habit prevents about half the confusing bugs beginners run into with Power Automate because it forces you to define the logic before building it with Power Automate.
- Step 4: Build small Power Automate flows, then test immediately. Do not build ten steps. Then test Power Automate. Build two steps, test Power Automate, build two steps, test Power Automate again. Debugging a five-step Power Automate flow that is already broken is more annoying than catching a mistake right after you make it with Power Automate.
- Step 5: Turn on run notifications for Power Automate. Power Automate can alert you every time a Power Automate flow runs or fails. Keep this on for at least your first couple of weeks with Power Automate. I caught two broken Power Automate flows this way before they caused any real damage.
- Step 6: Check the run history of Power Automate religiously. This became my number one debugging habit for Power Automate. Every Power Automate flow has a history tab showing exactly what happened during each execution, including the data it processed and any errors it hit. Ignoring this tab is the biggest reason beginners get confused about why something is not working with Power Automate.
Tips That Really Help
- Use the “Try it out” templates. Before you start building something from scratch you should search the template gallery. There is a chance that someone else has already built a big part of what the templates do and all you have to do is make a few changes to the templates.
- Name your flows properly from day one. I cannot stress this enough. “Approval Flow v2 FINAL Copy” is not a name. Use something like “PO Approval – Finance Team.”
- Add a Try/Catch pattern for anything important. Power Automate has “Configure run after” settings that let you handle errors gracefully instead of the flow just silently failing. I ignored this for months and lost data because of it.
- Check your flow run history regularly. Under “My flows,” you can see every single run and whether it succeeded or failed. I check mine weekly like checking a bank statement.
- Watch your licensing. Basic flows using standard connectors (Outlook, SharePoint, Excel, Teams) are usually included in most Microsoft 365 business plans. Premium connectors (like SQL Server, or certain third-party services) sometimes need an additional Power Automate license. This tripped me up when I built a flow connecting to a database and it suddenly stopped working after a trial period ended.
- Don’t over-automate everything at once. I got a little automation-happy in my second month and built flows for things that genuinely didn’t need it, like automating a task I only did once every three months It’s not worth the maintenance overhead for rare tasks.
Getting started — what you actually need
Before you open the app and start clicking here is what helped me avoid confusion in the first week.
- I found that having a Microsoft 365 account is necessary. My Personal Outlook.com account worked for some things, but most of the useful business features like Microsoft SharePoint, Microsoft Teams and Microsoft Dataverse need a work or school account from Microsoft 365.
- Do not use the desktop app away from the browser. It is simpler. You do not need to install anything on your computer.
- Understand the three types of flows, in Microsoft Power Automate before you touch anything in Microsoft Power Automate:
- Cloud flows — these run automatically based on a trigger (an email arrives, a file is uploaded, a form is submitted). This is what most people mean when they say “Power Automate.”
- Desktop flows (RPA) — these actually control your mouse and keyboard to automate old desktop apps that don’t have modern integrations. Think of this as the heavy-duty option for legacy software.
- Business process flows — these guide someone through a set of steps in a specific order, usually used with Dataverse or Dynamics 365.
For 90% of people reading this, cloud flows are what you want. That’s what the rest of this article focuses on.
Real Flows I’ve Built and Actually Use
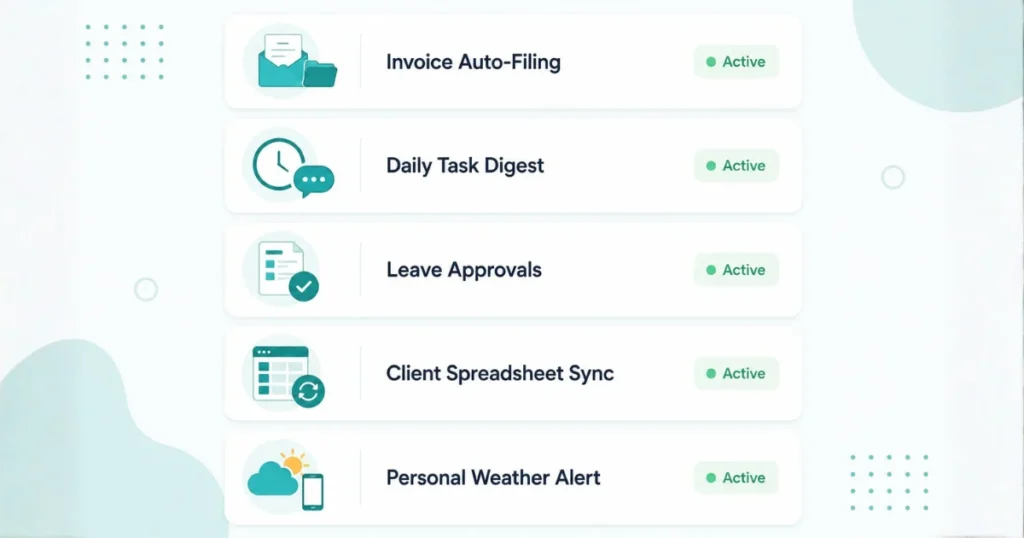
Automated invoice filing. Any email with “Invoice” in the subject line gets its attachment saved directly into a SharePoint folder, sorted by month. It sounds small, but it eliminates an entire recurring task from three different people’s weeks.
Daily task digest. . Every morning at 8 AM, a flow checks an Excel task tracker and posts a summary of that day’s due items directly into a Teams channel. No one has to remember to check the spreadsheet anymore.
Leave request approvals. A Microsoft Form feeds into an approval flow. The manager approves or denies with a single click from an email or Teams notification, and the response automatically updates a master tracking sheet. This one alone probably saved our HR coordinator a couple of hours a week.
Client status spreadsheet sync. The flow that started this whole journey — client status updates now sync into our tracker sheet automatically based on client ID matching, instead of someone manually retyping them from email threads.
A personal weather nudge. Not work-related at all, but a flow that texts me each morning if rain is expected so I remember an umbrella. A good reminder that Power Automate isn’t strictly a corporate tool — it’s genuinely useful for personal life too.
Mistakes Worth Knowing About Before You Make Them
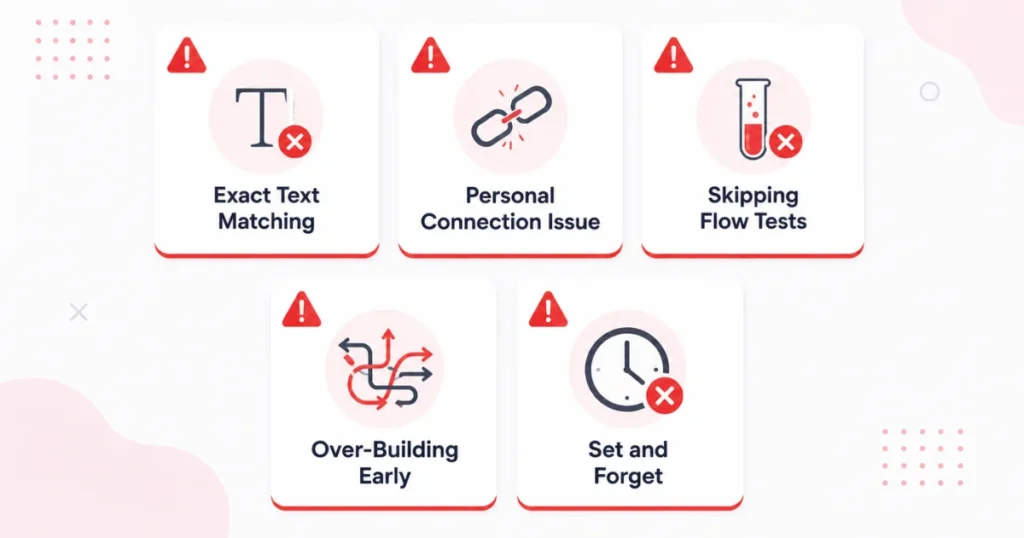
Building around exact text matches instead of patterns. Real-world data changes slightly every time. Subject lines shift, names get typos, dates vary. Build flexibility into your conditions from day one.
Forgetting that flows are tied to a personal connection. A flow you build using your own login might completely fail for a coworker who doesn’t have the same folder access or app permissions. If you’re sharing flows across a team, plan for this early.
Skipping the testing stage on “small” flows. I once assumed a two-step flow was too simple to break. It broke. Even small flows deserve a proper test run before you trust them.
Overbuilding too early. My most frustrating experience was a flow with about a dozen nested conditions, built before I really understood how conditions worked.It became unreadable and impossible to fix. I think we should start with something and then add more things to it once the basic version is working okay. This way the basic version of the thing we are making will be reliable. We can add complexity to it later on.
Assuming automation means “set and forget.” Connected apps update, folder structures change, permissions shift. I now check my important flows about once a month, just briefly, to make sure everything is still running the way it should.
Is it Actually Worth the Time Investment?
In my experience, absolutely. It doesn’t replace the work you’d typically do with actual software development tools, and it won’t do some tasks without a paid connector or a more technical solution.
between different apps-it is the single most useful tool I have encountered in my many years of office life.But for the bulk of work most of us are engaged in-sending out repetitive notifications, organizing files, approving things, keeping data in sync
The learning curve is real, but relatively gentle. Prepare to be baffled by some spectacular failures during your first week. Prepare for at least one automated task to inexplicably refuse to function as you anticipated. It is expected, and it is essential for the logic to make sense.
Final Thoughts
In conclusion, the spreadsheet that launched this whole exercise is still, in theory, up and running. But it hasn’t been personally modified in more than two years, and now updates automatically from the periphery, allowing me to focus on more important things rather than retyping the same data multiple times over. If you have one thing that you do over and over again just because you are used to doing it, start with that thing. Choose one task this week. Create a way to make it easier to know that you might make some mistakes, and when the task finally works out, you will understand the task.
Read More: Entrepreneur Guide: How to Build and Automate a Successful Business with AI
FAQs
Is Power Automate free?
It is not exactly free, but sometimes we refer to it as “already paid for.” If you have Microsoft 365 Business or Enterprise edition, you usually have a basic cloud flow with standard connectors (Outlook, Excel, SharePoint, Teams) available at no extra cost. A separate plan is also available with a limited number of runs for free. Premium connectors, desktop automation (RPA), and more runs require a paid Power Automate license.
How do I create a Power Automate?
Head over to make.powerautomate.com to log into your business or academic Microsoft account. Click on “Create,” and select “Automated Cloud Flow,” which is the most common flow type that people would prefer. Choose trigger (“for example, ‘When a new email reaches”), add necessary action steps, then click on “Save” and “Test.”
Is Power Automate easy to learn?
To be fair, the process is definitely easier than what most people think. It’s just along the lines of dragging-and-dropping and selecting items from a dropdown menu without the need to do any actual coding. You will learn how to do basic flows such as sending out email notifications, saving files, getting simple approvals, etc in a day or so just by playing around with the templates. However, it starts getting complicated when setting up conditions, loops, or variables which takes a bit of trial and error to master. I have broken quite a few flows in this long run but nothing took me more than 2 days to get used to it.
Can I use Power Automate without a license?
To a certain extent, there is a free plan that you can sign up for to create basic cloud flows using standard connectors with no paid license required. IIf you have Microsoft 365 for Business or Enterprise at your workplace you can use basic automations without spending any extra money. You will only have to pay if you need to use premium connectors like Microsoft 365 for Business or Enterprise premium connectors such as SQL Server or some other third-party apps. You will also have to pay if you want executions or if you want to use desktop or RPA automation features with Microsoft 365 for Business or Enterprise. In most cases, the free plan or the included 365 plan should be sufficient for basic personal or small business flows.
What is the best use of Power Automate?
Truthfully, the best purpose is to eliminate the manual tasks that you are already doing every week — approvals, email updates into trackers, sorting files, etc. For me, these were the approval flows, where after the submission of a form the app automatically gets the approval from the manager via Teams and updates the spreadsheet automatically without anybody having to chase the signatures for approval. Notification flows are really important. They tell a channel when something big happens, like when someone adds an item to SharePoint or fills out a form. This is great, for tasks that’re boring and need to be done the same way every time.
What is the cost of a Power Automate license?
The Premium Package costs nearly $15 for every user every month and provides premium connectors along with limitless cloud functioning. This is usually the plan that most smaller groups end up buying. For unattended desktop automation (bots working when there is no user logged in), one must pay approximately $150 for every bot every month. The free plan normally comes with basic functions and standard connectors. Thus, in reality, almost everyone has gone through this process without spending cash or needing premium connectors and RPA bots.
What are the disadvantages of Power Automate?
When it comes to the cost of premium connectors and higher levels of service, it skyrockets as soon as you add more users or need unattended RPA bots. The product is also closely connected to the Microsoft ecosystem — connecting to third-party applications does work, but is definitely a lot more cumbersome than using a tool like Zapier that’s specifically designed for this. Desktop flows (RPA) tend to be easy to break; in my case, I had them fail when a button was simply displaced on the screen. In addition, debugging complex flows with a great deal of conditions and loops is widely more confusing than debugging standard code that allows you to check it out step by step.
The best ways to use Power Automate ?
Power Automate is great for things like approving requests. You can also use Power Automate to update spreadsheets from emails. Power Automate can help you with organising files. It can send notifications for you. You should use Power Automate to make your work easier by automating the tasks you have been doing manually. This will save you time and energy. Power Automate can do things for you so you do not have to do them yourself. The main thing to do is to think about what tasks you do every day that’re boring or take a lot of time. Then use Power Automate to automate those tasks. This way you can focus on things. Power Automate is very useful for automating tasks. These tasks yield the maximum benefits and require minimum effort for implementation. Start out with the templates available in the gallery, as these templates have the most common cases addressed. Use simple flows for individual processes, rather than combining ten different tasks into one big flow, since it would be much easier to fix any issues arising. Always conduct tests using real data, not just clean sample data.